Wednesday’s Whip Up: Vintage Spools

Back in July, we took a trip to Folly Beach, near one of my favorite places – Charleston, SC. Hubby and I used to live there and I never get tired of the history, architecture, food and shopping!
While there my sister-in-law, Ilke, and I vowed to do some antique shopping. We took one afternoon and hit as many as we could in the ares outside of downtown. {Downtown’s antiques are WAY over our budget!} Here are some of my finds…

I found several vintage handkerchiefs, ribbons and lace. I had no idea what I would do with them, but I had to have them!

And I am a sucker for vintage spools.

Originally I was going to leave the spools the way the were and use them as candles sticks. But I had an idea the other day while I was trying to figure out where to put them.
I decided to wrap them in burlap and then use the vintage ribbon and lace on top of the burlap.

I used hot glue to secure the burlap on the backside. I did the same with the lace. The ribbon I just tied in a knot, tightly enough that it would not slip down.

I frayed the top and bottom of the burlap by pulling some of the horizontal threads out.

And that was it! Just something I whipped up on Wednesday!

Summer Vacation Mini Album

We just returned from a fabulous weeklong vacation to Folly Beach, SC. I have tons of pictures document this trip and so I thought I’d make a mini album that will be easy to carry around so I can share with family and friends.

scrapbook mini album beach

I started with a small notebook that I purchased from a dollar bin. {Michaels or Target, I believe.} Those dollar bins get me every time! Especially since now they all have adorable stationary and matching pens! I have an entire drawer full! So I was glad to finally use one for something!
I searched my stash and found some coordinating papers and ribbons.

I cut the papers into a variety of sizes in order to layer.

I ran the red paper through my Big Shot in a circle embossing folder.

So here are my pieces after I cut them to layer.

I thought this font {Quirky Alphabet from Stampin’ Up!} looked kind of beachy! I used Not Quite Navy ink to stamp “Folly” on a little wooden tag for added dimension, and “2012” on the paper flag.

You can distress the edges of paper by brushing the edges against the ink pad.

distress paper edge

This helps make this little piece of paper pop against the larger background pieces.

I layered the pieces like so. {Please ignore the shell. I thought this was where I was going to put it but changed my mind and moved it in the next step.}

I cut the ribbon into similar size pieces.

Then tied them around the elastic band of the notebook. Then I glued the shell to the knot of the ribbon.

stampin up ribbon embellishment

And that’s my $1 notebook turned mini-album!

I plan on using double-sided tape to attache the photos to the pages. I will also leave several pages blank to jot down memories of our trip and to document descriptions of the photos.

scrapbook mini album beach

Thank You for the Letterpress!

I finally got to sit down and make something other than favor boxes the other day. I had some new products to try out and I came up with this cute little thank you card.

I recently became a Lifestyle Crafts affiliate {Eeek, I know! So excited!} So when this showed up on my doorstep, I couldn’t wait to get my craft on!

They sent me a Letterpress Starter Kit and a letterpress ink and printing plate set of my choice. I chose the tile printing plates with teal blue ink. Fun and mod, don’t you think?

Anyway, I was a little nervous about using this thing, even though I got to test drive it last year at Creative Estates. I’ve told you before, I’m not one who likes to read directions, but I gave in and thought it might be a good idea. This thing had a lot of parts! It was actually much easier than I thought and had only a few simple steps.

You first attach the printing plate piece or pieces to the letterpress platform. You can use the grid to make sure your placement of the printing plates and your paper match up.

You use the ink base and brayer to roll out the ink and apply it to the printing plates. I did remember from the conference last year that they said a little ink goes a long way. And boy did it ever! I used only a tiny drop! This ensures that you get even coverage on the printing plates and also prevents bleeding from too much ink.

Close the platform.

And crank this puppy through the machine. My machine is a Big Shot, but any embossing/die cut tool (Epic 6, Revolution, etc.) Speaking of Revolution, don’t miss the deal going on right now! I wasn’t familiar with this tool, but it sounds pretty magnificent!  It’s similar to the Epic in that it die cuts and embosses but it has a 4-inch magnetic platform, so when you put your metal dies on the platform, they hold tight and don’t slide off! It is easy-to-use and compact. Huge promotion going on right now for this machine! See below for details!

Okay, I got a little excited! Back to the card. here is how it looks after running it through the machine.

Now to make the card. I absolutely love this teal ink and it was so hard to choose which coordinating paper I should use! I had several in my stash!

I went with butterflies and polkadots! I used the polkadot designer paper as the backdrop and used my top note die to cut a frame-like shape with the butterfly paper.

Next I used my scalloped border punch to create a decorative edge strip of cantaloupe-colored paper.

A few coordinating butterflies.

I grouped them together and used a dimensional adhesive. This raises the butterflies slightly for some added texture. I also used a pearl embellishment in the center. I forgot to mention that I used black ink to distress the letter pressed paper.

Oh yeah, and I used sticky strip, an extremely sticky, double-sided tape, to hold the gathered ribbon. To do this you just fold it, kind of accordion-style, and attach one side of it to the tape. The ribbon I used is Stampin’ Up! ruffled ribbon in Island Indigo.

And there is my card! Then I realized, I can make a matching envelope! I used another printing plate from the tile set. I covered the lower part of the envelope with a piece of scrap paper. Same technique shown before.

Perfect! Except that I now realize it probably isn’t supposed to have the grid included in it! Oops!

Maybe I should send it to Lifestyle Crafts to thank them for this fabulous set!

Don’t miss out on these sa from Lifestyle Crafts’
April 16-22  you can get a 24 pack of patterned paper for only $10! That’s 50% off the normal price and you can use Scissors & Spatulas promo code  (SCISSORS) to get an additional 20% off! In case you’re not good at math, that’s 70% savings!
 Revolution, is being offered for $59.99 (Reg. $89.99) while supplies last! AND, of course you can use Scissors & Spatulas promo code (SCISSORS) to get an additional 20% off! That’s just $47.99!
 Want more reason to order now? You’ll receive free shipping on all orders of $25 or more on lifestylecrafts.com through the end of April!
What are you waiting for? Go shop! Just don’t forget to enter SCISSORS at check out to receive an additional 20% off!

Great Idea for Ribbon Storage

How to make a “Ribbon Rack” from a UTO {unidentified thrift store object}.

Quite awhile ago, sometime over the summer I think, I was at Goodwill and I saw this. . .

I wasn’t really sure what it was. Maybe a plate rack? A towel rack? No idea! What I did know is that I liked it. Plus it was only $4. I also knew exactly what I was going to use it for. You see, I have a lot of ribbon. Every time I go to Hobby Lobby, I end up coming home with more ribbon. They have the cutest! Anyway, all my ribbon was in a drawer which a) made it difficult to find what I was looking for and b) a big mess when the ribbon came unrolled. This unidentified piece was about to solve that problem.

First it needed some “Heavy Cream” paint. This paint is made by Valspar and it’s one of my favorite colors. Not bright white, but not too off-white. Then, of course, I had to distress it.

The piece originally had three rods and a lot of empty space. I had hubby drill three more sets of holes.

I grabbed some dowel rods we had in the garage {I’ve told you before we have TONS of scrap wood in our garage. Every size, shape, etc. This is when it comes in handy!} and hubby measured and cut them long enough to be inserted into the drilled holes.

We ended up adding another hole and rod in between the two upper rods.

The rods fit perfectly through the holes in the center of the ribbon rolls.

Now when I need ribbon, instead of digging through my drawer, I can simply tug on the ribbon and cut it at the desired length! I love this thing!

Whoop whoop! Partying it up here this week!

Seat Sacks for the Kids

Cleaning, organizing, cleaning and more organizing. That’s what I’ve been doing for the past week. I’ve got a huge pile in the garage to donate, and overflowing trash can and still so much stuff that I have no where to put it!

Last January, I organized my kiddos’ coloring table by creating these IKEA knock-off hanging buckets which was a great way to organize their crayons, markers and pencils. It’s also been a great space-saver since the table is small. However, the buckets didn’t solve the problem of coloring book and paper storage. Since the boys got new coloring books, activity books and stickers for Christmas, I needed a solution. I wanted everything to be right there, at the table where they could see and reach the books on their own.

I came up with these cute little seat sacks! Back when I taught kindergarten, several teachers used these on the backs of the students’ chais since kindergarteners use tables, not desks. They are perfect for holding books, paper and other table activities.

I really didn’t have a method to making these. I kinda just made it up as I went along. I started by measuring the fabric to fit the length and width of the chairs, also making sure it was wide enough to hold books.

I started with a long, rectangular piece of fabric for each chair. I basically hemmed the entire length of both sides as well as the top. I did not hem the bottom.

Instead, I measured the length needed for the pouch and folded the fabric up once, then folded the same length again. This not only created a more durable pocket, but it also “lined” the inside of the pocket so you don’t see the backside of the fabric.

I cut four strips of ribbon, 12-inches each. I folded the length of the ribbon in half and attached it to the top of the sack. I double-stitched the ribbon so that it could withstand the weight of the books.

And that was it!

 I tied the ribbons around the chair backs.

These cute little seat sacks took me about 30 minutes! They solved my coloring book storage problem and they allow all the activities to be visible and accessible to the kids!

**These sacks will be available in Scissors & Spatulas’ Shop which is coming soon! Several colors and fabrics will be available. In the meantime, I can take orders via email! jen at scissorsandspatulas dot com.**

Are you ready to see if you won either of the $100 giveaways?

The winner of $100 from AMEX Serve is. . .

Michelle Alvin on  said:   I signed up for Serve!

And the $100 prize from Kodak Galleries goes to. . .
Congratulations to both of you! Not a bad after Christmas present, heh? Be sure to email me ASAP to claim your prize! {jen at scissorsandspatulas dot com}


Todays Creative Blog


Wicked Witch Pumpkin

Don’t miss the bloggy birthday bash giveaways going on now to celebrate S&S first birthday!

Can you believe that Halloween is in less than a week?! In case you are looking for some last-minute Halloween decorating ideas I’m going to share with you my “Wicked Witch Pumpkin.”

If you’ve been here before, you know that I make weekly trips to the crafts stores to pick up some items to get my creative fix. Sometimes (often times) it’s more than once a week. Anyway, I was at Michael’s one morning and came home with these.

Two black pumpkins and some wired ribbon. What did I have in mind to do with these? I hadn’t the faintest idea, I just knew I “needed” them. Once I got them home and started pondering, I decided that I wanted to decorate the pumpkin with a witch silhouette. 

I stopped by Pinterest to see if I could find any ideas there. Of couse I did! I decided to add “wicked” to my witch pumpkin. This is the image I created with my Silhouette SD.

If you don’t have one of these machines, you gotta get one! It’s fabulous! The possibilities with it are endless!

I cut the design out on outdoor vinyl. Black was the only color I had on hand which obviously wasn’t going to show up on a black pumpkin. What did I do?

I spray painted the vinyl orange before sticking it on the pumpkin! But I wasn’t quite finished. 

I added the ribbon to the top along with a candy corn pick that I had on hand.


Perfect! I decided one black pumpkin was enough for my front porch. I’m still trying to decide what to do with the other one I bought. Maybe I’ll just wait ’til next year!

Trying Something New – Paper Crafts!

I recently started making paper crafts thanks to my MOPS buddy Angie. Angie is incredibly talented in decorating and crafting. She is also a Stampin’ Up demonstrator/sales rep. I’ve been a scrapbooker for years, but Angie introduced me to a whole new world of paper crafting. I’ve recently started making greeting cards, mini photo albums, and a few other paper crafts.

Here are two of the mini albums I made designed by Angie.
{Please excuse the photos. I took these at night so they are kinda dark.}

Materials needed: embossed heavy cardstock, coordinating designer scrapbook paper, envelopes, ribbon, brads, silk flowers, buttons, stamps, ink pads, scalloped or floral punches, a hole punch and scrapbook adhesive.

The first is a matchbook album. This is the front cover which closes just like a matchbook and is held together with a ribbon at the top. 

Inside the book are several pages, each a different style, to hold a single photo. 
The second is an accordion-style album. This album opens like a book and is secured shut with a ribbon.
Inside envelopes are attached to create a vertical accordion which houses unique pages for single photos.
A huge thanks to Angie for showing me how to craft with paper! I know I don’t have the step-by-step tutorial today, but don’t worry, I’ll be making more of these soon and sharing with you exactly how to do it! 

This week I’m linking up to these fabulous parties:

Todays Creative Blog


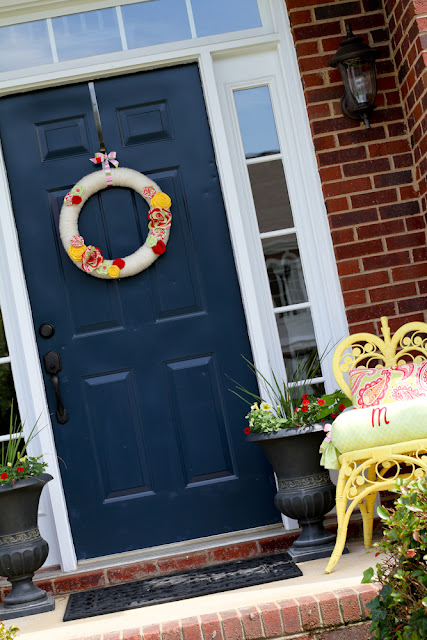
Summer Porch Decor

It started with a chair from Goodwill that cost just $12. It reminded me of some chairs my parents had when I was little. It was in almost perfect condition. Even the paint looked good. It just needed to be cleaned. I kept walking but in the end, left the store with the chair.

I went from Goodwill to Home Depot to pick out the perfect color of  paint to fix this baby up. I left with  Krylon Bright Idea.

Two coats later, my pretty chair was good as new and a bright sunny yellow!
On to Hobby Lobby to find some things to add to my new chair.
A straw wreath, some fabric, buttons and yarn came home with me.

I already showed you my summer wreath tutorial a couple weeks ago. Besides the yellow paint, it was the inspiration for my summer porch makeover.

I had lots of extra fabric and a pretty yellow {but boring} chair. Hello, PILLOWS!

I added a simple square pillow and a monogrammed bolster pillow to complete my chair.
I’ve given you a full tutorial on how to make a monogrammed bolster pillow here.
Some bright {and of course, matching} flowers.
It ended with a welcoming porch that screams “Happy summer!”

Welcome to our home!

Decorating for Summer: Front Door Wreath

A couple of months ago I shared with you the baby girl wreath I made for my friend Cindi for her baby shower. Well since making the wreath for her, I’ve been wanting something similar for myself. And what better way to decorate my door for summer than with a summer rosette wreath?
Here’s how I did it. . .
You’ll need a straw wreath {I found mine at Hobby Lobby near the grapevine wreaths}, yarn, coordinating fabric, buttons and a hot glue gun.
To be honest with you, I don’t think I’ll EVER do the yarn part again. For my friend’s baby shower I wrapped the wreath with burlap fabric strips which was pretty simple. I like the way the yarn wreaths look but man, it was time consuming! I sat on my couch and wrapped the wreath for almost two hours! Seriously, it took the entire episode of American Idol to wrap this thing in yarn! Maybe it’s because I’m slow, maybe it’s because I’m a perfectionist, I don’t know. It took forever! Anyway, I taped the yarn to the plastic covering and started wrapping it around and around and around. I did three layers filling in the spaces as I went.

Next I made the flowers. I decided to use both rosettes and layered petal flowers for this wreath.Click here for photos and tutorials on making both these flowers. 
Once the flowers were finished I added the buttons to a few and arranged them around the wreath.

I used hot glue to secure the flowers and tied a grosgrain ribbon around the top to hang it.

And there ya go! My new summer wreath! 

Framed Hanging Silhouette Plaques

Happy Friday! The theme for round two of American Crafter was home decor. A pretty open theme. I decided to use a little something that I made my mom for Mother’s Day for my entry this week. She loved it and I hope you will too!
Framed Hanging Silhouette Plaques

Those profile silhouettes are my two brothers and myself. A couple weeks ago in my MOPS {Mothers of Preschoolers} group we learned how to make silhouettes using sweet Kristyn’s {I met her at GNO AZ} tutorial at Lil’ Luna. Here are the ones I cut of my boys during our craft session. 
Now I can remember my parents paying big bucks to an artist at Disney World to have our silhouettes made. Of course he could just look at us and cut a perfect profile silhouette! This method is much easier {and much more friendly on your wallet}! All you need is a camera, a printer and some scissors. 
Here are the steps for cutting the silhouette:
1. Take a close up profile photograph.
2. Print the photo on regular paper to the size you wish to cut. For these I printed 5×7.
3. Cut around the profile leaving a 1-2 inch border.
4. Using a pen, trace around the profile making sure to capture small details such as lips, hair lines, etc. At this point you can also add things like bows, collars, etc.
5. Using double-sided adhesive on ONLY the outer edges that will be discarded, secure the photo to card stock so it will not slip.
6. Use sharp scissors to cut around the traced line of the photo.
Easy enough, right? 
Ok, now for the plaques:

I started with three unfinished wooden plaques {$1.99 each} from Hobby Lobby.

I stained the wood using a dark colored stain. Mine is mocha but any dark wood stain will work fine.
I used one light coat of primer and two coats of Olympic Irish Cream latex paint.
After the paint was completely dry I used a low grit sandpaper to remove areas of paint around the plaque to let the dark stain show through. You can do this as much or as little as you like. It all depends on your preference. I like a lot of wood showing through. Then I used a template to cut ovals {slightly smaller then the face of the plaque} from an old book.
 I used Mod Podge to adhere them to the wood. One coat on the wood and two coats on top was plenty. *Note: the paper did bubble up in a few places. I used a plastic scraper to gently smooth out the bubbles. 
I used the same double-sided adhesive to attach the silhouettes to the plaques.

I used a glue gun to attach ribbon to the back of each plaque for hanging.

After hanging all three silhouette plaques I enclosed them in a large, open frame made out of some scrap trim pieces we had in the garage.
And that was {one of} my gifts to my awesome mom who put up with a lot of stuff from me over the years.
Thanks mom! 
If you have a minute, head over to Nap Time Crafters to cast your vote for round two!
Pretty, pretty please!