Pumpkin Pie Cheesecake

Today I’m going to share with you a really yummy recipe for a traditional Thanksgiving dessert kicked up a notch!

Okay, back to the dessert! Last year for Thanksgiving, I decided to ditch the traditional pumpkin pie and  try something new. Something a little more decadent, a little richer and a lot yummier. Pumpkin Pie Cheesecake! It was fantastic! 


One thing I didn’t mention about myself is that I love to cook. Over the years I’ve learned which recipes I like, which I don’t and which I need to modify. Oftentimes my cooking now is a recipe {or combined recipes} modified to suit my likes. That is the case with this dessert also!  I combined a couple different recipes to make my own crust. For the cheesecake I used Paula Deen’s Pumpkin Cheesecake recipe

For the crust: 10-12 gingersnap cookies, 1 cup graham cracker crumbs, 1/2 cup pecans and 1/4 cup melted butter, 2 Tbsp. sugar. You can adjust measurements to suit your taste. I used more graham cracker crumbs than cookies. 
 
Combine cookies and pecans in a food processor until finely ground.
Mix graham cracker crumbs, cookie mixture, melted butter and sugar with a fork, just until combined.
Transfer crumb mixture to a springform pan. Press crust firmly onto the bottom, and about 1 inch up the sides of the pan.
Now for the cheesecake.
 
 Be sure your cream cheese has been sitting out for at least an hour to get nice and soft so your cheesecake will not be lumpy! Beat softened cream cheese until creamy, about 3 minutes.
 

Add pumpkin, sugar, eggs, sour cream and spices and mix just until blended. Add flour and vanilla and continue to mix until well blended, stopping to scrape sides and bottom.

Pour batter into prepared crust. As you can see, mine is a little lumpy. I think this could have been prevented if had I used the wire whisk attachment on my mixer. Oh well, it still tasted good!
 
{I did not follow this recipes directions for baking the cheesecake. After reading reviews I chose to bake using the water bath.}
Bake in a 350 degree oven in or above a water bath. My springform pan would not fit into my water bath pan so I placed it underneath. This is supposed to prevent the cheesecake from cracking due to temperature changes during cooking and cooling.


Bake for 1 hour 20 minutes. Turn off oven and open oven door, leaving cheesecake in the oven while it cools. Place on cooling rack. Once the cake is completely cooled, remove outer edge of the springform pan. 


Serve with a dollop of whipped cream and a drizzle of caramel sauce.
 I hope you’ll include this dessert in your Thanksgiving spread. You’ll be happy you did!

 
Paula Deen’s Pumpkin Cheesecake recipe

{Remember, I did not follow this recipe’s directions for baking the cheesecake. I baked using a water bath.


Graham/Ginger Snap Crust
1 cup graham cracker crumbs
10-12 ginger snap cookies
1/2 cup pecans
1/2 stick melted butter
1-2 Tbsp sugar
 

In a food processor, process ginger snaps and until finely ground. In a bowl, mix graham cracker crumbs, cookie and nut crumbs, butter, and sugar with a fork until combined. Transfer to springform pan. Press into the bottom, and about 1 inch up the sides of the pan.


Wicked Cute Treat Bags

I’m so excited to be here today to participate in the Monster Craft Bash! I’ve seen some wonderfully fun projects and recipes so far! Ready to see what I have for you? 

I’m going to share with you how to make these darling little treat bags! They make a great gift for teachers, a great party favor for a Halloween party or handout on Halloween night {if you really love your trick-or-treaters}.


I started with a sheet of 12×12 Halloween scrapbook paper. I chose three pieces of cardstock to match.
Next I cut three different size circles for layering. You can do this with a cutting machine, such as a Silhouette SD, with a die cut machine or just regular punches. If you do not have access to any of these products, you can certainly trace different sized circles and cut them out with regular and decorative scrapbook scissors. The point is to have different sizes and possibly different shapes.


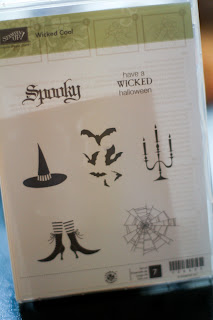
I purchased this adorable “Wicked Cool” stamp set from Stampin’ Up! You can find a variety of Halloween stamps in your local craft store or, if you’re not a stamper, you can just print an image off of your computer.
 Here is how I created the stamped center piece. . .
I started with the web, applying a light coat of ink and only stamping 3/4 of the actual stamp on my circle. Next I used “have a WICKED halloween” stamp, this time applying more ink so it would stand out. Then I brushed my circle lightly across the ink pad to give it a distressed look. Finally I embellished it with a small rhinestone in the center of the web.
I used regular scrapbook adhesive to attache the bottom circles and used a dimensional to attach the top circle. The dimensional raises this layer and adds a little something extra to any paper craft.


Next I cut a 1 1/2-inch strip of the scrapbook paper.


I used my scoring tool to create the pinwheel to go behind the scalloped circle. I just bought this new toy and I love it! You can find them in the scrapbooking section at the craft store. You certainly could create the accordion fold without, but a scoring tool makes it much easier.


I attached the two ends with glue dots. . .


and hot-glued the pinwheel behind the layered piece made earlier. I used hot glue because the pinwheels seem to have a mind of their own and tend to be a little difficult. Hot glue puts them in their place.


I filled the cellophane bag {which I also got from Stampin’ Up} with candy corn.
Then I folded two coordinating ribbons and stapled them to the top of the cellophane bag.
Finally, I hot-glued the ribbon and bag to the back of the pinwheel.


A perfect and cute little Halloween treat!
Happy Halloween y’all! I hope you’ll stop by my blog, Scissors & Spatulas, and do some browsing!

Better Than Anything Cake

I love to cook, but I’m not nearly as adventurous in my cooking as I like.  I have two little guys, so anything I make has an “easy button.”  On this particular day it was raining {for like the third day in a row} and we were in need of something to occupy our time to make all of us happy.
This is what we made. . .
For little one’s ears, we called it “Better Than Anything Cake.” But come on, we all know what it’s really called. Yes, this is Better Than Sex Cake. {GASP, did she just say. . .? Yes, I did} Okay, now that you know how good the cake is, you want to make it, right?
Ingredients:
box Devil’s Food Cake Mix {plus ingredients required on the box}
14-oz can sweetened condensed milk
12-oz jar caramel ice cream topping
8-oz container frozen whipped topping
chocolate-toffee candy bar (such as Heath or Symphony) or toffee chips
Mix and bake the cake according to package directions.

Watching the mixer do it’s work. No, they aren’t fascinated by the machine. They are waiting patiently because they know they will get this:

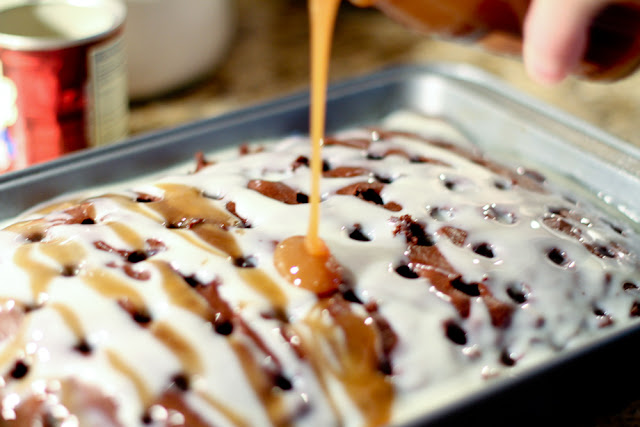
Cool for 15 minutes. Using the handle of a wooden spoon, poke holes in the cake about 1-inch apart.

Pour the sweetened condensed milk over the cake, allowing the holes to fill.

 Do the same with the caramel sauce. Place in the refrigerator for several hours. The longer this cake soaks, the better it gets so be sure to prepare it several hours in advance!
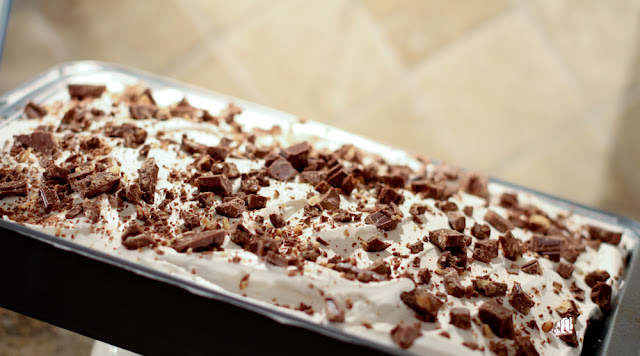
 If you decide to use a candy bar for the topping, chop it up into small pieces.

Just before serving, spread the whipped topping evenly over the cake.

Sprinkle candy bar pieces or toffee chips over the whipped topping.

Now cut yourself a nice big piece and enjoy!
I promise, if you’re having a bad day, this will make you feel better. If your day is great, well, this will make it greater!
Be sure to keep this cake refrigerated! In my opinion, the cake is better the second day!

Headboard turned into a Chic Bench DIY

Before I get started, I’ll tell you a little secret. . . I love junk! Hand-me-downs, antiques, garage sale and thrift store items, etc. I love it because I have a knack for turning one person’s junk into my own treasure. The best example to show you how I turn trash into treasure is by sharing with you how I turned this old, broken headboard {trash}
into this cute little foyer bench {treasure}!
First, let me give you the story behind this trash to treasure. This was my hubby’s bed as a child. It was broken into several pieces and was collecting dust and cobwebs in the shed at my in-laws’. It was going to be tossed to the curb until I claimed it for myself because I had a vision of what to do with it. So, being the little scavenger that I am, I loaded it up in the car and hauled it home.  Now I had a piece of trash
great headboard in the garage begging to be rescued!
Here is how I did it.
First, I sanded all the pieces well to rough it up for painting. I used a mid-grade grit for this because I wanted to remove the varnish. It scratched the wood a little, but I’ve learned from my experience that the paint will fill in the scratches.
Next I primed all the pieces with water based primer.
This is where I turned it over to the hubs.
I told him what I wanted and he purchased a 2×4 piece of wood and a deck board. The 2×4 was cut into four pieces and the deck board into three. He did some sawing, some rearranging, some screwing and some gluing to create this. . .
The entire bench was created from the headboard with the exception of two 2x4s which attached the front of the bench to the back of the bench. The other wood is used below. At this point, I put two good coats of paint {Olympic Irish Cream}on the bench and deck boards.
The deck board was used for the seat.
The other two pieces of the 2×4 were attached under the first to hold the boards in place.
I then sanded random areas of the bench, allowing the wood to show through to give the bench an aged, distressed look.
When I was finished, I couldn’t have been happier! It was exactly what I had wanted!
I’m so glad I had a vision, rescued and brought back to life an old broken headboard. I am using it as a bench for my foyer. Now my boys {I have two} have somewhere to sit to put on their shoes! Not to mention a piece of hubby’s past!
I hope you’ve enjoyed my trash to treasure idea today!

DIY Monogrammed Bolster Pillow

I’m very excited to be here today to show you how to make a monogrammed bolster pillow. If you don’t know what a bolster is, don’t worry, I didn’t know that is what they were called either until just a week ago! It’s basically a cylinder-shaped pillow.


Here’s mine. M and our family were established in 2004 when we were married. These are actually really easy to make. Here is what you’ll need.


         Fabric (I used burlap), freezer paper, acrylic paint and stencil brush and ribbon.
First I used my Cricut to make the monogram stencil. Simply place the freezer paper on the mat {shiny side down}and cut out whatever you want transferred to your fabric. If you don’t have a cutting machine, you can certainly trace or print a letter on the freezer paper and use an exacto knife to cut it out.


Once you have your letter cut, place it on the fabric and use a hot iron {steam off} to adhere the freezer paper to the fabric. *Note: the freezer paper did not completely stick to burlap. I used packaging tape around the edges to help keep it in place.
If you’ve never stenciled before, there is a technique to help ensure the paint does not bleed under the paper. Squeeze a small puddle of paint onto a plate. Dip your brush in the paint and use a rolling motion to cover bristles in paint. Dab off excess on the plate and gently apply to fabric using dotting and circular motions.


Once the paint is dry, remove the freezer paper. {I had a little boo boo with one of my zeros. I used a wet tissue to try to remove some of the paint. Ooops, mistakes happen!}


Measure and cut your fabric to the desired size and sew a hem around all edges. If you do not have a sewing machine you could do this with hemming tape. {Because I used burlap, I added an extra layer of fabric so that it wouldn’t be see through. That is the extra “flap” you see.}
 Fold the fabric in half horizontally making sure your monogram is on the inside. Pin the edge and then sew. Invert the fabric so your monogram is now on the outside.
Slide your pillow into the center of the sleeve leaving equal amounts of excess fabric on each side. If you do not have a pillow to use, you can use a sheet of Styrofoam or poly fil batting. Just roll it into a cylinder to fit inside your fabric.
Secure the ends of the pillow with ribbon.
Now proudly display your new pillow in your home!

Baby Shower Pennant Burlap Wreath – DIY

Today I’m going to share with you a wreath I made for a friend’s baby shower. No friends with a bun in the oven? Don’t go away yet. . . this wreath can be changed to suit any holiday or occasion.

So my friend was having her first baby, a girl, but she wasn’t sharing the name. I helped throw a shower for her and I was in charge of decor and favors. I looked at a pre-made banner while out shopping but, me being me, was up for the challenge of a DIY banner! But then I got to thinking, “If I’m going to put the effort into making this banner, why not make something she can use again?” And so I decided to make a wreath instead. This way she could hang it on her door when the baby arrives.
So I made my weekly trip to Hobbly Lobby and walked the entire store and came home with burlap, pink linen, a hay wreath, scrapbook paper, and ribbon.
 
This is what I did with it. . .
 
{The pennant says “baby girl.” Remember, we didn’t know the name}
Here is how I did it. . .


I cut the burlap into strips about 2-3 inches thick.
I wrapped the burlap strips around the wreath using hot glue to secure the fabric on the back side of the wreath.
I used my Cricut to cut two different size triangles and letters for the banner. {I used the Basic Shapes cartridge for the triangles and the Cuttin’ Up font cartridge.}
I layered the cut pieces {large ivory triangle, smaller print triangle then letters} and used an adhesive pen to stick them together. These are my pennants which read “baby girl.”


I measured and cut two pieces of grosgrain ribbon slightly larger than the diameter of the wreath. I stretched the ribbons across the wreath and wrapped the excess ribbon around the backside.
I secured the ribbons with hot glue on the back side of the wreath.


I then used a hot glue gun to attach the pennants to the ribbon.
Next I made some rosettes out of burlap and pink linen. I started by cutting the fabric into three-inch strips. Then I twisted the fabric somewhat tightly and began wrapping around and around in a spiral fashion, securing with hot glue on the under side every other circle.


Here is a finished rosette. I tucked the end of the fabric on the back side and secured with hot glue.


For the center of the burlap flowers, I rolled thin blue silk ribbon tightly and secured the end with hot glue.
I placed the flowers around the wreath and added some triangles from the scrapbook paper to mimic the pennants.

And here it is! The baby girl pennant burlap wreath. Again, change the colors and words to make this wreath suit any occasion!

Rag Rug For Lucy’s Room

CAUTION: This project could take your entire life depending on how big you want it. Attempt only if you have excessive amounts of time on your hands!! 

I’m only kidding, sort of. Keep reading.

Screen Shot 2013-10-14 at 7.39.48 AM

I decided I wanted a rag rug to place in front of Lucy’s crib. I briefly looked in stores such as Home Goods, Target, etc. All had rag rugs, but none had the right colors! So I moved on to searching for how to make my own. Of course my first resource was Pinterest. I searched and I found this tutorial from Everyday Art.

Screen Shot 2013-10-11 at 11.36.50 PM

{photo courtesy of Everyday Art}

So it looked easy enough and I decided I needed to do something crafty anyway to get me through the remainder of my pregnancy. After all, it had been months since I’d even explored anything that involved DIY.

So why the bold comment at the top of this post warning you to attempt at your own risk? It will take you forever to complete and you have to have a TON of fabric! To prove my point let me tell you a little side story…

I was at Hobby Lobby for the 3rd time buying fabric for this project. Yes, the third time! i kept running out! There was a lady in front of me buying small amounts of several different fabrics. The lady at the fabric counter is very nice (or maybe just nosey) and always inquires about what you will make with the fabric being purchased. When she asked the gal in front of me I heard her say she was making a rag rug for her son’s nursery. So of course I jumped in and said I was doing the same and went on to complain that it was my third trip to buy fabric and 4th week working on the rug. She had one up on me. It was her 4th trip for fabric and she had been working on rug since she was pregnant. Her son was 7 weeks old! So it wasn’t just me! This was the project that would NEVER end!

IMG_5571 But seriously, look how cute it turned out! So if you are still brave enough to attempt this project, here are my recommendations.

1. Work on this in all your spare time when your hands are fre

2. Don’t underestimate the amount of fabric needed. You will return to the store (at least twice) to purchase more.

So to make the rug you will need a rug pad with large holes. They come in a variety of sizes and you can always cut it to fit the size you want. You will also need A LOT of fabric. Like 15-20 yards total. Choose a variety of different fabrics in the colors that coordinate with your room but also choose different patterns. The pattern on the fabric won’t matter because you won’t be able to see it anyway.

cut fabric strips rag rug

fabric strips rag rug

Using the tutorial above, simply loop the fabric strips through the holes of the rug pad.

Screen Shot 2013-10-11 at 10.06.24 PM

You can see here how I skipped a few random spaces in each row and a row in between.

Screen Shot 2013-10-11 at 10.06.39 PM

This made the rug plenty full.

IMG_5581

So try if you dare. It is definitely an adorable product with a tedious process. Lucy likes it!

New winner for the Minted.com giveaway. I’ve picked two and neither has come forward to claim their prize. Let’s try one more time. 

Screen Shot 2013-10-21 at 10.14.53 PM

Oh Diana, it’s you!!

Screen Shot 2013-10-21 at 10.13.13 PM

Please email me so I can give you your prize. 🙂

Failure to Post

Well, I had a yummy recipe to post tonight for a fennel & apple salad but my cord to download my pictures from my camera is missing. Figures!

minted-logo-525x393

But I wanted to announce the winner of the Minted.com giveaway.

Screen Shot 2013-10-06 at 8.54.04 PM

Comment #17 was Jennifer who said….

Screen Shot 2013-10-07 at 9.29.31 PM

Congratulations Jennifer! Be sure to contact me in the next 48 hours to claim your prize!

Even if you didn’t win or if you missed the giveaway, consider Minted for your holiday cards this year. Check out some of their designs here minted.com/photo-christmas-cards.

A Last Minute Decision

 So last week I shared with you the progress of the land preparations that were done for the new house. {If you missed it, you can read about it here.}

prepping land for building custom house

Although it was exciting to see things changing, even if it was just dirt being pushed around, we were ready for more! So we were very excited the day the surveyor came out to plot the house. That is, until we saw where the house was plotted!

plotting house baxter river district

You can’t tell very well from the photo, but the house took up pretty much the entire width of the lot. And, because it was so wide, the only way it would fit was to move it really far back (our lot is skinnier in front, wider towards back) leaving us no back yard.

plotting house baxter river distrcit

It also left us very little side yard on either side.

staking2

I was completely devastated. We all knew the house was wide, but no one had anticipated we would have to plot it so far back on the lot. We also didn’t expect it to take up the entire span of the lot.

There was only one logical thing to do to solve this problem and it was not something I was very happy about. In order to get our back yard, we would have to switch our side load garage to a front load. So right there, on the spot, I had to make a decision. I wasn’t happy about it, but it didn’t seem we had much of a choice, so we said go for it. So our plans have changed from this…

custom house abberley lane modification

to this…

custom house abberley lane modification

I REALLY didn’t like this idea at first. I didn’t want the garage to be the first thing people saw when they looked at our house. I didn’t want it to be a distraction from our huge, beautiful front porch. However, I realized that our garage does not sit in line with the front of the house, it’s a good bit back, so attention will not be drawn to it too much. It’s  grown on me and I”m ok with it now. It’s moved our house up a lot and given us much more of a back yard. It’s all good.

So then we were ready for the footings to be dug and poured. Ready and waiting. We waited because of sleet and ice (Remember, we are in SC and that doesn’t happen EVER!) and we waited longer because mother nature decided that after a summer and fall of drought, it was finally time for it to rain.
But we finally had a couple days of beautiful sunny weather and have our footings!

digging footings river district baxterfooting digfootings dig

It was cool to finally see the footings because it really gave us an idea of exactly where the house would sit on the land and also we could get a better idea of the size.

footings poured river district baxter footings poured river district baxter footings poured river district baxter

We were so thankful that this part was complete because we knew that now they could really get started on the building! Not only was it exciting to finally see the footings complete, but I found this on the lot too.

oversized brick foundation

The bricks for our foundation!oversized bricks

Until next time…

playing on the lot river district baxter

Screen Shot 2013-03-25 at 7.48.41 PM

{visit site here}

Screen Shot 2013-03-25 at 7.59.01 PM

{visit Facebook page here}

 (See next post here}

A little time out…

Ok my friends, I tried. I really, really did. Over the past several months I’ve tried to share new, creative ideas with you. But for me, these lame posts just aren’t cutting it. I miss (and I’m pretty sure you do too) refinishing furniture, re-decorating rooms, coming up with new, creative home decor. But to be honest, there is not a whole lot I can do right now.

For those of you who follow my blog, you know that we are in the process of selling our current home in order to build our dream home.

southern living abberley lane floorplan

Our plans have been under construction for several months now. I’ve shown y’all on a couple different drawings of our version of the Abberley Lane shown above. Well, even though I said it was finished, I fibbed! Or maybe just changed my mind a few more times. We are in the final stages of detailing and we made a few minor changes since the last time I shared with you the elevation and floorplan. I’m excited to show you, and I will, as soon as I get it back from the architect! And, we have chosen our builder as well! I’ll announce that soon too!

The good news is that after less than a week on the market, our house is under contract! Not only that, but we have less than one month until closing! While this is all very exciting, it is also terrifying to know that I have to pack up my entire house (and I got a lot of stuff people) and find somewhere to live while our new house is being built! Yes, I’m freaking out a little bit!

(source)
So back to the point of this post. I’ve tried, I really have tried to make things as interesting as they used to be. But since I knew we were moving it seemed sill to re-decorate, I was afraid to paint furniture because I don’t know what my colors and decor will be in the new house, and frankly, I just didn’t have any creative motivation. But I did try my best to post some things. And I planned on continuing to do so, until today.

I stressed all day (while packing) about getting a post up. You see, I get anxiety if I don’t post frequently enough. It used to be that I had to post every day. But then when I started my business I learned to relax and that it was ok to skip a day or two here and there. But lately, I’ve been skipping more days than posting and it’s causing me major anxiety. (I found this little comic here and thought it was funny.)

Then today I had this moment where I realized that I needed to take a break. Not a permanent break. Oh no, I’m going to be sharing with y’all the building of the new house! And then I get to share decorating it!!!! But I am going to take a temporary break for the next few weeks while I pack the house up.

So I hope that you don’t mind. I might still post here and there. But I want to do it because I have something to post or because I have a few spare minutes to do so. I don’t want to feel pressured or anxious about it. But please don’t leave me! I promise that when I come back, I’m going to have way more to talk about and to share than I’ve shared in the last year! I promise! I’ll be back soon…