Halloween Matchbox Treats

lifestyle crafts matchbox die cut stampin up halloween

Yes, Halloween is right around the corner! Can you believe it? It is time to start thinking about those Halloween treats!
The Lifestyle Crafts Fall Core Collection 2 cutting dies have just been released!

And I’ve used two of these items to make the cute little Halloween treat boxes above!

The Rectangular Matchbox Cutting Die was used to create the treat container. I chose some coordinating Halloween papers from Stampin’ Up! and ran them through the Big Shot with the matchbox die cut.

Here is box number 1…

lifestyle crafts rectangle match box cutting die

This designer series paper I used for this box, Wicke Fun, is one of my favorite holiday papers! And it’s on clearance right now and are 50% off the regular price!! Get it here before they are gone! I also used the bat punch, also on clearance (order here) and the new rosettes die cut (order here).

stampin up halloween rosette

Once the box is cut you fold it and put it together  so it looks like this. The rosette die cuts and scores the paper. To create the rosette, you will fold (accordion style) the scored marks, glue the two end pieces and push the center inwards and fill the center with hot glue to secure. The circles and bat are punched and the white circle is stamped with using the Wicked Fun stamp set (order here).

rectangle match box cutting die stampin up rosette

I added a stip of matching card stock around the box. Before I attached it, I stapled coordinating ribbons. Don’t worry, the staple will be covered by the rosette!

lifestyle crafts matchbox cutting die

Then I secured the rosette piece on the strip with hot glue.

stampin up rosette wicked cool halloween

Now for box number 2…

In addition to the matchbox die, I used the Lattice Doily Die, also from the new collection, for the second box.
I ran it through the Big Shot, using grey card stock.

lifestyle crafts latticedoily cutting die

The doily was then folded to fit around the box.
This designer series paper from Stampin Up! is Howlstooth & Scaringbone, the new Halloween collection. This collection is fun! It features orange and ivory polka dots, herringbone, stripes, orange chevron (TRENDY), grey & ivory polka dots, and a few other very “in” prints (order here).

lifestyle crafts lattice doily matchbox cutting die

Like the first box, I stapled coordinating ribbon to the doily piece before attaching it to the box (order here). The rosette was created like above. Now check out the cute googlie eyes on the mummy! I actually purchased this stamp from Michaels (in the dollar stamp bins) but you can find a similar stamp set here. And the adorable googly eyes have adhesive backing (order here).

 lattice doily matchbox cutting die stampin up howlstooth

A glue dot to attach “spooky” (from the Wicket Fun set) and hot glue to attach the rosette.

stampin up howlstooth googlies

Ladies and gentlemen…
you have some adorable Halloween treat boxes!

lifestyle crafts matchbox stampin up wicked cool bats

lifestyle crafts matchbox stampin up howlstooth goolies

lifestyle crafts matchbox die cut stampin up halloween

And here is one other matchbox (not Halloween related) I created using the rectangular matchbox cutting die from Lifestyle Crafts.

lifestyle crafts rectangular matchbox cutting die Remember the Spooky Halloween Coffin I shared with you last week?

lifestyle crafts coffin die cut stampin up wicked fun stamp

The Tricks-n-Treats dies are now for sale! There are a bunch of fun Halloween die cuts to choose from so be sure to take a look!

And don’t forget, you can save 20% by entering the code SCISSORS at checkout!!

Easy As Pie Gift Box

I wanted to share with you these cute little “Easy as Pie” boxes I made as a make and take a few months ago.

The box was cut using Lifestyle Crafts’ dessert box die cut. You use the die to cut the paper of your choice. I used one of my favorite Stampin’ Up! designer series papers, Summer Smooches {order here}, with coordinating card stock {order here}. The die cut will also create perforated edges which you will fold. Then you just glue the sides together to create the top and bottom pieces of your box! Easy as pie!

To decorate the tops of my box, I used Stampin’ Ups Summer Smooches fabric {order here}. In case you didn’t know, Stampin’ Up! has adorable coordinating fabrics for most of their designer series papers. You get three coordinating fabrics in a set for only $9.95. Check them out here.
Anyway, I used the Fun Flowers die to cut paper and fabric flowers {order die here}. I layered the flowers so that the petals were staggered, added a smaller punched flower and used a coordinating brad {order here} to attach them.

I made little tags for each box and stamped “sweet treats” on each tag. This stamp came from a set called Teeny Tiny Wishes. It has just about every greeting you can think of {order here}. I tied a simple ribbon to each tag and looped it around the brad.

I ended up using some ink to distress the edges of my boxes. I just think it adds a little something extra and always makes it look better.

I love this dessert box die cut! Check out more ideas for Lifestyle Crafts die cuts on their blog and Pinterest page.

Back to School Gift Ideas with AstroBrights Paper

This is a Sponsored post written by me on behalf of Astrobrights Papers by Neenah Paper. All opinions are 100% mine.

Have your kiddos gone back to school yet? Our summer officially ended when my boys went back to school this past Friday. And although it stinks to say good-bye to summer, good-bye to the beach and pool and the late summer nights, WE are all excited about the new school year.

Being a former teacher myself, I love to show teacher appreciation and I’ve tried to pass this along to my boys. I l try as often as I can to make little gifts, treats or cards for the boys’ teachers to show my gratitude for all they do. And at the beginning of the year, I know they need supplies. So gift cards (Walmart, Target, Dollar Tree, Walgreens, etc) are the best thing you can give them!

So I knew exactly what we were going to do with this lovely batch of AstroBrights sent to me int he mail.

I was going to create some cute gift card holders.

I found some darling “scholarly” designer paper to coordinate with the AstroBrights paper.

The first project with a little pocket on the front to hold the gift card.

 I used my Silhouette CAMEO to cut the pocket and the ticket.

The rest of the pieces are cut to fit and punched. The layout if very similar to my popsicle card.

The little pocket has preferrated edges that you fold which are glued to the surface of the card.

Here is the card once the pieces are secured. I found some coordinating bright turquoise blue baker’s twine to loop through the tag.

The gift card fits perfectly on the tag and right inside the pocket! {In case you are wondering, I’m not giving them an ITunes gift card! It’s the only one I had on hand.}

The next is a cute little gift card box. I can’t take credit for designing this one. We made it in Stamp Club and my demonstrator, Angie Guy, created it.

I started by cutting the faces of the box and the decorative flowers. These were all cut using Stampin Up! dies.

Next I had to create the box that holds the cards. You do this by cutting a sheet of  5 1/2″ x 6″ paper. Score the 6″ side at 1″ and 5″. Score the 5 1/2″ side at 2 1/2″ & 3 1/2″ Then cut slits as shown below.

Then the scored edges are folded and creased with a bone folder and glued together to make a box that is open at one end.

Large 4″ and 3.5″ scalloped circles were cut with my Silhouette CAMEO. I used the same color as the face of the box and the designer paper. I also added a rhinestone embellishment in the center of the small, layered flowers.

After gluing the two large scallop circles together, lay them over the top of the box and gently crease a mark for each of the box faces. After the creases have been made, use a bone folder to finish the folds. Attach the inner side of the scallops to the back side of the box.

Then you just attach the smaller flowers to the front of the box and use velcro with adhesive backing to hold the closed.

Check them out…

Fun and bright! What a great way to celebrate back to school!

Want your paper announcements and projects to get noticed? Want your newletters, flyers and brochures to stand out from the others in that pile of papers? AstroBrights paper is the solution!

AstroBrights papers come in 23 brightly colored shades sure to stand out in the “crowd” of paper stacks. 

And don’t miss your chance to enter the “Give a Brighter Year” sweepstakes! 

Enter your favorite elementary school to win $30,000 in supplies! And, if they win, lucky you will also get $500! Talk about a win-win situation!

AstroBrights is also hosting “Make Something Astrobright” design challenge.  This contest is designed to bring families together and encourage creativity. What will your family create with AstroBrights paper? There is a different challenge each week so be sure to check it out! You can enter both of these things by going to the AstroBrights paper Facebook page.


Last Minute Teacher’s Gift

If you follow me on Instagram, you probably saw this photo I posted.

I was at Target last Wednesday, in search of a last-minute gifts for Parker Reese’s teachers, and, of course, was side-tracked by the Dollar Spot! It gets me every time! As I was ooohing and aaahing at all the fun summer stuff, I started getting an idea for the perfect gift! Thirty minutes and about $50 later (not all was for the teachers) this is what I came home with.

target dollar spot stationary

Yeah, I went a little crazy! I couldn’t help it! It was all so cute and fun!

target dollar spot stationary

By the time I returned from my impulse shopping, I only had about 20 minutes to get these gifts together before school was over! By the way, let me make it clear that teachers are worth way more than a quickly thrown together present, but my absent mind didn’t realize that it was the last day of school! DUH!

So I took the cute little buckets and personalized them by adding a vinyl monogram cut with my Silhouette CAMEO.

monogram bucket

I stuffed some tissue paper in the bottom of the buckets. I kinda wish I had some shredded paper, but tissue was all I could get so last minute.

gift wrap bucket

These polkadot clipboards are adorable, right? Well I grabbed some coordinating ribbon from my stash to jazz them up a little bit.

embellish clipboard

The clipboards had a little hole at the top to hang the clipboards on a nail or tack. I stacked the ribbon on top of each other, fed it through the hole, and tied it in a knot.

embellish clipboard ribbon

I stuck the clipboard in the bucket and used it as the backdrop for the rest of the items. Next I put this cute watermelon stationary with matching pen in one bucket. The other had some cute citrus stationary with a polkadot pen.

watermelon stationary

And that was it! Nothing super fancy. Not super expensive. But they were adorable and screamed summertime!

gift buckets

I hope the teachers liked them!
Don’t forget to thank your little one’s teachers for all their hard work!

Last Minute Semi-homemade Gift Ideas

Can you believe there is just two days left until Christmas Break? That means only two more days to put together your child’s {children’s} teachers’ gifts. Buying teachers’ gifts can be expensive, especially if you have more than one child who may have more than one teacher. But teachers love getting gifts {remember, I was once a teacher} and they totally deserve them! But you don’t have to spend a fortune. Just get a little creative! Give them something homemade! Or better yet – semi-homemade! Here is what my boys’ teachers are getting. {I hope they haven’t stumbled upon my blog yet!}
These cute little buckets filled with homemade white chocolate popcorn mix and a personalized ornament. The total for each gift ended up being about $10. 
I found these cute “paint” buckets at Hobby Lobby. At 50% off,  I think they were $3. 
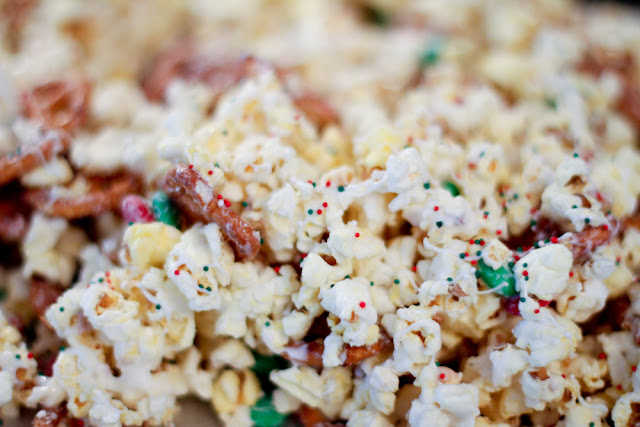
I decided to fill them with my yummy white chocolate popcorn mix. This recipe isn’t new. I’ve posted it before when I shared my “Ready to Pop” baby shower favors. Actually, I make this mix all the time and modify the colors and ingredients to match the occasion. I’ve found that I really like the addition of pretzels. If you are making it for kids, marshmallows are good in it as well.

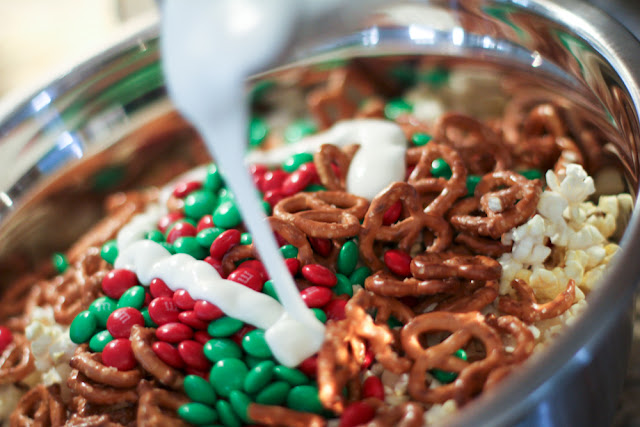
Ingredients: popcorn, mini pretzels, premier white chocolate morsels, M&Ms. 
Melt white chocolate in microwave at 50% power for about 2 minutes, stirring every 30 seconds, just until melted. Do NOT burn!

Add popcorn, pretzels and candy to a very large bowl.
 Pour about 1/4 cup melted white chocolate over the popcorn and stir. 


Repeat two more times until popcorn is generously coated in chocolate. Be sure to save some to drizzle over the top.


Pour popcorn mix on a cookie sheet lined with wax paper. Using a spoon drizzle remaining melted chocolate over popcorn.

At the last minute I decided to add red and green sprinkles to give it a little more holiday flare! Allow the popcorn mix to cool and harden for about an hour and store in an air-tight container until ready to use.

I love to buy these food and bread bags to use for Christmas goodies. They are perfect for packing up homemade goodies and fit nicely into any size container. So I lined the bucket with the bag. . .

and filled it up with the popcorn mix.
This cute personalized ornament serves as a gift and gift tag! It was just $5. I tied the ornament on with some coordinating ribbons that I had in my craft supplies. And that was it! 

White Chocolate Popcorn Mix Recipe
3 bags microwave popcorn, popped
3 cups mini pretzels
1 – 12 oz. packages premier white chocolate morsels
1 – 12.6 oz. bags chocolate coated candies (such as M&Ms)

Mix popcorn, pretzels and candy in a large bowl. Melt white chocolate morsels in microwave at 50% power for about 2 minutes, stirring every 30 seconds, until melted. CAREFUL NOT TO BURN!!! Drizzle a small amount {about 1/4 cup} of chocolate over popcorn and stir to coat. Continue adding chocolate, a little at a time, until popcorn mix is fully coated. You will use about 2/3 of the white chocolate. 

Spread popcorn mixture on a cookie sheet lined with wax paper. Using a spoon, drizzle remaining white chocolate over popcorn. Allow to cool for 1 hour before breaking popcorn mix into large chunks.

Here are a few other handmade ideas for you. These are items I made in Stamp Club made from Stampin’ Up products, but you can use any materials you have.
Stocking gift card holder. A few great giftcards for teachers: Target, the bookstore, Dollar Store, restaurants. Those were always my favorite. 

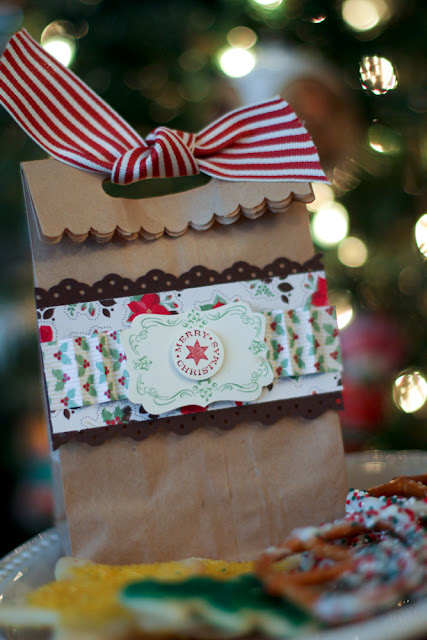
This cute little goodie sack is made from a paper lunch bag and scrapbook paper. 

A cute little box with a removable rosette flower. Everyone loves rosettes! You could even attach a pin back to it.
You probably shouldn’t send wine to school, but this tag could be used for any bottled drink. It would fit nicely on a bottle of Monin syrup accompanied by a bag of coffee.
These also are fantastic gifts for co-workers, bosses, neighbors, service people, etc. And they are so easy to throw together at the last minute. But because they are semi-homemade, the recipients will think you put a lot of time and effort into making them!